
Motivation
My primary motivation for creating a blog is to document new topics as I learn them. In the past, I’ve spent hours exploring a framework or writing a proof of concept to satisfy my curiosity, but these efforts weren’t documented anywhere. As a result they have been lost to the sands of time, locked into hard drives that have long since been recycled and disposed of.
In this post, I will document the process of creating this blog (the final product can be seen here). I will not be giving step-by-step instructions (these can be found within the Hugo Documentation). Instead, I will be highlighting my overall thought process and some gotchas I ran into along the way. This blog was created using the Windows 64-bit version of Hugo. Installation instructions can be found here.
Researching Existing Blogs
The first step in the process of creating a blog is drawing inspiration from other blogs and websites that you enjoy reading. I decided to research other blogs on the following criteria:
- Content
- Layout
- Other Design Elements
Here are some blogs/websites that I researched:
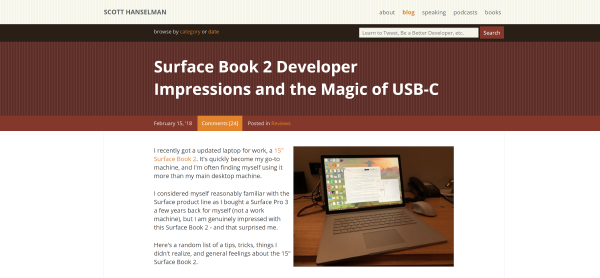
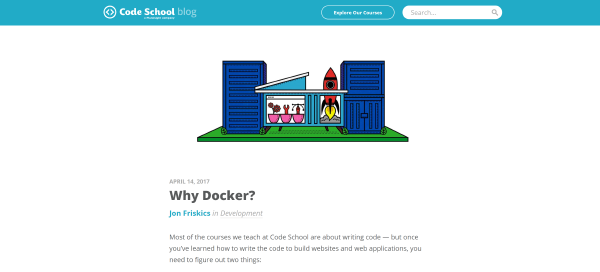
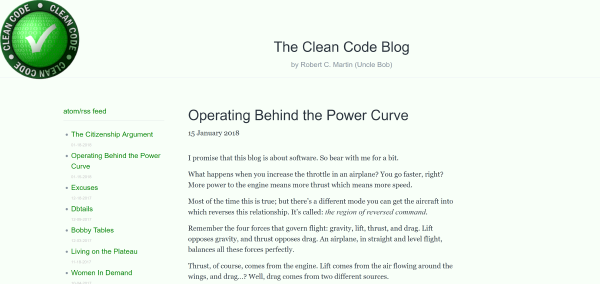

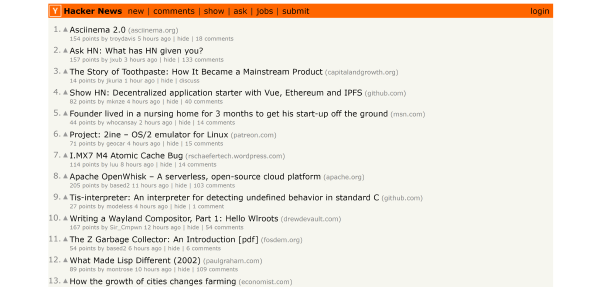
I really admire the simplicity of Robert C. Martin’s blog and the Hacker News website. The lack of extraneous design elements allows the reader to focus on the content rather than images, social buttons, and sticky nav bars. Another takeaway was that I really enjoyed the banner images at the top of posts for the Code School and Nautilus blogs.
Choosing (and Implementing) a Layout
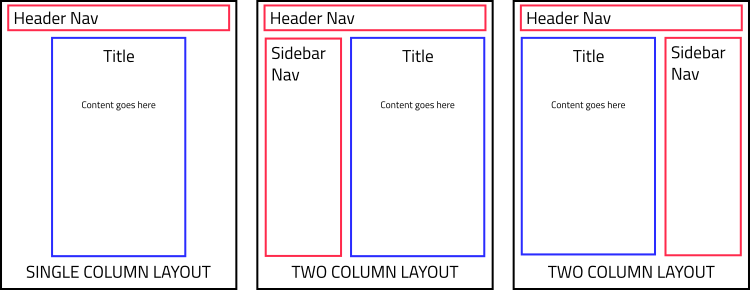
I chose to take the approach of first designing a static demo webpage to act as a template. Then, when I was satisfied with the look that was created, I translated and split up this template into something Hugo (my chosen blog engine) could handle. Hugo requires two types of pages: the page that displays a blog post, and the page that lists blog posts (based on section, tag, or category) to choose from. This first type is called a single page, and the second type is called a list page. So, to form the skeleton of my static template I had to choose a general layout for both. I decided to start with the single page template. I found that 99% of blogs out there fit into one of 3 categories: single column, two column with the content on the right, and two column with the content on the left:
Of the blogs that I researched, I liked the layout of the Nautilus blog the best, so I tried to replicate their two column layout (if you compare my page structure to theirs, it is very similar). When trying to implement this layout, I found the Learn CSS Layout website to be very helpful. Here is some pseudo-code of my blog post layout (this is for a two column layout with the content on the left):
<header></header>
<main>
    <article>
        <section id="post-content"></section><!--
     --><aside id="post-sidebar"></aside>
    </article>
</main>
<footer></footer>main {
padding: 0 15%;
}
#post-content {
width: 70%;
display: inline-block;
vertical-align: top;
}
#post-sidebar {
width: 30%;
display: inline-block;
vertical-align: top;
}You can view a jsbin of this simple layout example here. The list layout was very simple to implement. It’s just a sequence of div tags, each representing an article.
Designing Type for Legibility
The built-in browser css styles for fonts and written text do not make for very easy to read blog posts. I adhered to the following principles when creating my templates in an effort to maximize legibility:
- Use a large enough
font-size: I set my body text to 16px. Small text can be difficult to read. - Adjust the
line-heightappropriately: I chose aline-heightof 1.6. This allows the reader to focus on the line they are currently scanning without their eye being distracted by the adjacent lines. The additional white space gives your content a less condensed and more approachable look. - Make sure your font color and background have enough contrast: This is especially important for individuals with vision impairment. You can check your contrast score (based on the Web Content Accessibility Guidelines (WCAG 2.1)) using the interactive tool at https://webaim.org (The tool is pre-filled with this blog’s contrast score).
- Make sure your font color and background don’t have too much contrast: Black text on a white background or vice-versa can strain the eyes. It’s best to have dark grey and off-white colors (while still making sure you have enough contrast to be legible).
- A shorter line length (or measure) is easier to read: The ideal line length is 66 characters (source). Line length is a function of
font-sizeand the width of the containing box. It is difficult to enforce this in a web environment, because users can easily resize their browser window and adjust their font size. I tried to ensure that the line length wasn’t too long during typical use. It is around 80 characters long with afont-sizeof 16px and a window width of 1536px (my containing box has its width specified as a percentage, so line length is actually a function of font-size and window width in my case).
For more suggestions on web typography, check out the following website: webtypography.net. I haven’t implemented all of the suggestions in this guide, but I may revisit it in the future.
What is a Static Site Generator?
Traditionally, when you want to create a website that merges data/content with templates to return a fully formed html page to the browser, you use a server side language (python, ruby, C#, etc.). The HTTP request for a specific page from the browser hits the web server. A call is then made by the web server to retrieve the requested content from a SQL database. This content is then combined with a predefined template (Jinja, ERB, Razor, etc.) to generate an html file. This file is sent back to the browser and displayed. This is how WordPress works. It uses PHP as its server side language, and MySQL as its database to store content related to blog posts. If you just use the admin interface and install themes, you may never see those internal details.
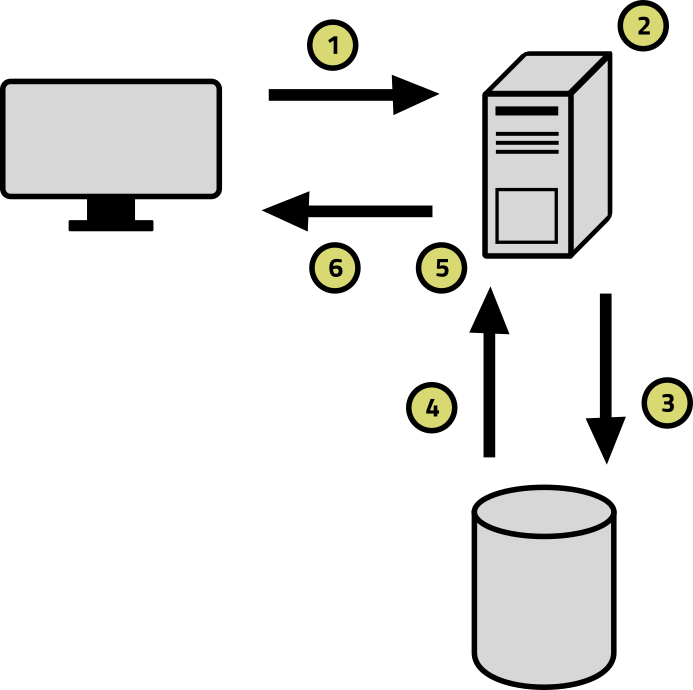
- A user’s browser makes an HTTP request for a specific page on your blog.
- The web server locates the correct template and SQL query based on the requested page.
- The web server sends the query to the SQL database for execution.
- The data returned from the SQL database could include: post content, title, author, date, tags, etc.
- The web server combines the retrieved data and template to form the HTML page that the user was looking for.
- The page is returned to the user, where it will be rendered by their browser.
For some websites this setup is required because of the dynamic nature of the data and pages being rendered. In the case of a blog, it is total overkill. Performance can be improved by setting up different caching schemes (saving trips to the database and cpu-intensive template rendering calls), but it isn’t worth it for a site that doesn’t differentiate between users when serving content.
An alternative approach is to use a static site generator. In this approach, you use a framework/application that runs on your local computer (not on a web server). This application combines templates with content files to create the html files for your website all at once. You then upload these static files to a web server. Now, when a browser makes an HTTP request for a specific web page, the web server just returns the file that was generated ahead of time. No database is even required (eliminating a huge dependency and reducing complexity considerably). Your hosting options become a lot cheaper as well, because you don’t need to run any application code. You just need a host that can serve static files.
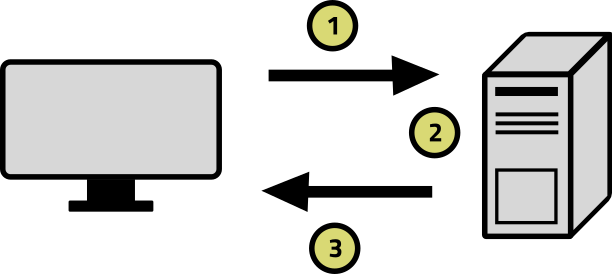
- A user’s browser makes an HTTP request for a specific page on your blog.
- The web server locates the correct HTML file that was already generated ahead of time by your static site generator.
- The page is returned to the user, where it will be rendered by their browser.
Benefits of Hugo
The most popular static site generator by far is Jekyll. It is a great choice with a huge community and a lot of resources for learning. I chose to go with another static site generator, Hugo, for my site for one reason: it compiles your website lightning fast. If you have a website with a lot of content, Jekyll will take much longer than Hugo to recompile all of your pages. This is not ideal if you want a REPL-like experience when blogging (update a file, check the browser to see how your changes look, rinse and repeat).
Hugo has all of the features that you need to create a well organized blog:
- Content (in Markdown files) separated from layout, allowing you to focus on your content while authoring posts.
- Code reuse via partials and shortcodes.
- Site organization through categories, tags and sections.
I find that Hugo strikes a nice balance between keeping things simple, while providing the capability to create custom behavior when desired.
Translating My Static Templates Into a Blog Engine
Check out the example repository at https://github.com/camdenreslink/simple-hugo-example. Clone the repository and follow along. The rest of the article will roughly follow the structure of that Hugo example.
At this point in the process, I had two html files with the exact layouts I wanted for my blog. Dummy Lorem Ipsum content was filled in, and all of the CSS was crammed into a style tag in the head. I needed to turn these templates into something that Hugo could understand, enabling me to write real blog posts. Here is a simplified version of those steps:
mkdir code.camdenreslink.com
hugo new site code.camdenreslink.com
The hugo new site command automatically scaffolds a new Hugo site for you (as the name implies). The resulting directory structure looks like the following:
code.camdenreslink.com/
├── archetypes/
│   ├── default.md
├── content/
├── data/
├── layouts/
├── static/
├── themes/
└── config.toml
The next step is to create the default layouts for a blog post and list of blog posts. In Hugo, these site-wide default template files go in the \layouts\_default directory.
cd layouts && mkdir _defaultThen, create the two template files:
code.camdenreslink.com/
└── layouts/
    └── _default/
        ├── list.html
        └── single.html
Here is a very basic idea of what each file might contain:
<!doctype html>
<html lang="en">
    {{ partial "head.html" . }}
    <body>
        {{ partial "navbar.html" . }}
        <main>
            <article>
                <h1>{{ .Title }}</h1>
                {{ .Content }}
            </article>
        </main>
        {{ partial "footer.html" . }}
    </body>
</html><html lang="en">
{{ partial "head.html" . }}
<body>
{{ partial "navbar.html" . }}
<main>
{{ range .Paginator.Pages }}
<article>
<a href="{{ .Permalink }}">{{ .Title }}</a>
<p>{{ .Summary }}</p>
</article>
{{ end }}
<nav>
{{ if .Paginator.HasPrev }}
<a href="{{ .Paginator.Prev.URL }}">PREV</a>
{{ end }}
{{ if .Paginator.HasNext }}
<a href="{{ .Paginator.Next.URL }}">NEXT</a>
{{ end }}
</nav>
</main>
{{ partial "footer.html" . }}
</body>
</html>Wait a second! What is with the curly braces and calls to this thing called partial? Hugo uses the templating library that is part of Go’s standard library (Check out the Hugo templating docs here). The double curly braces are how Go injects dynamic content into a template. For example {{ .Title }} in list.html will get replaced with the blog post’s actual title when Hugo’s compiler is run and the content is combined with the templates. The partial calls are a way to reuse html snippets in multiple Hugo templates (keeping our layout code DRY). We want the same navbar and footer on every page, so we define those in partials. Assuming we’ve added the partials required for the above templates, our directory structure will look like the following:
code.camdenreslink.com/
└── layouts/
    ├── _default/
    │   ├── list.html
    │   └── single.html
    └── partials
        ├── head.html
        ├── navbar.html
        └── footer.html
Remember how I said that I had my css crammed into the head of the static templates that I had created to work out my desired layout? At this point in the process, I just copied and pasted those styles into a file called styles.css. In Hugo, anything that is going to be static (images, css, javascript, fonts, etc.) is stored in the static/ directory like so:
code.camdenreslink.com/
└── static/
    └── css/
        └── styles.css
Now I can refer to that in my html templates using <link href="/css/styles.css" rel="stylesheet">.
Creating Content and Testing Locally
Let’s assume that I’ve divided my templates into logical partials that follow the look and feel of my original templates. This means we’re ready for content. Separating content from layout is one of the best features of a static site generator. You don’t need to rewrite all of the html markup for every page you create (like in a purely static site). Hugo takes care of that for you, and allows you to focus on writing your posts.
The content of Hugo blog posts is stored within the content/ directory as Markdown files. Top level directories within the content/ directory are considered to be sections by Hugo. Sections get their own list page (using the list.html template we created before), and act as a way to group together similar posts. My blog has 4 sections (data, dev, math and misc), so the directory structure looks like:
code.camdenreslink.com/
└── content/
    ├── data/
    ├── dev/
    ├── math/
    └── misc/
In the old way of doing things (pre-0.32 Hugo), you would place your .md files directly in these section directories. The only downside to this approach, is that images need to be placed in your static/ directory. This is far away from your markdown post within your source tree, which is inconvenient. In Hugo 0.32, the concept of bundles were introduced. You create a bundle, by creating a directory (not just a markdown file) for your blog post as a subdirectory of the section directory. Within this bundle, you create an index.md file. This file acts as your blog post. You can then place images and other resources within the bundle directory, colocating all of your material for a blog post. You no longer have to hunt around your Hugo project to find a relevant file. Here is an excellent blog post describing bundling and how to use Page Resources in Hugo (it’s a pretty new feature, and documentation is lacking at the moment).
Create a bundle with a blog post and an image within a section:
code.camdenreslink.com/
└── content/
    ├── data/
    ├── dev/
    ├── math/
    └── misc/
        └── misc-article-1
            ├── img
            │   └── misc-article-img.png
└── index.md+++
title = "This is the First Misc Blog Post"
date = "2018-02-22"
+++
This is a Header
----------------
This is the blog post content. Fill this with Lorem Ipsum if you want more content.The part at the top of the markdown file delimited by +++ is called the front matter, and it uses the TOML format (it can use YAML or JSON as well). The front matter sets up variables and configuration used by the layout templates.
To view the page that we’ve created, enter the following command in the root of your Hugo project:
hugo serverThis command compiles your site, and runs a local web server to serve the static pages that have been created. The page that we’ve created will be accessible via the url: http://localhost:1313/misc/misc-article-1.
Creating a Hugo Shortcode
We still haven’t used the image that we included in our bundle. In order to do this, we’ll need to create a Hugo shortcode. Hugo is very strict about the separation of content and programmability/layout. You can’t include any Go template syntax in your Markdown files. This means that you can’t access any of the built-in variables or functions. Shortcodes are the way around this. They allow you to define small chunks of functionality that can enhance your Markdown.
Including resources on a page requires access to the .Resources Page variable, so we need to create a shortcode to gain access to this behavior.
code.camdenreslink.com/
└── layouts/
    └── shortcodes/
└── imgproc.html{{ $image := .Page.Resources.GetMatch (printf "%s*" (.Get 0)) }}
<img src="{{ $image.RelPermalink }}">Now let’s try including it on our page:
+++
title = "This is the First Misc Blog Post"
date = "2018-02-22"
+++

{{< imgproc "img/misc-article-img.png" >}}

This is a Header
----------------
This is the blog post content. Fill this with Lorem Ipsum if you want more content.
If your hugo server command from earlier is still running, you should be able to see an image on your page now.
Setting up an Asset Pipeline
I also made my Hugo project a Node module by running npm init. I am using node to create thumbnail images as a build step. I also converted my large CSS file containing all my styles into more single purpose less style files. I am currently running these jobs manually using npm scripts (thumbnail generation and less compilation), but if more build steps are added in the future I will create a gulp file to organize my tasks.
Deployment
Hugo is great because at the end of compilation, you just have static files to deploy. Any host that supports static file hosting and SSL works. You could even host using a web server like Nginx or Apache on a VPS like Digital Ocean. I chose to host on Firebase because it is easy to use, free (up to a certain amount of resources used), and it performs well. Hugo has a dedicated document on getting set up and deploying to Firebase here.